The following are the various methods that you can use to fix any issues involving Email syncing/sending/receiving problems in relation to error code 0x8007274c and 0x80072726.
Method 1: Disable the third-party firewall that you are using
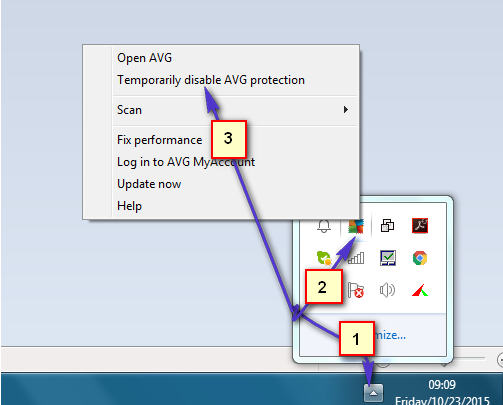
The most common culprit behind error code 0x8007274c and 0x80072726 are third-party firewall applications, such as BitDefender and AVG, that do not allow the Mail app to communicate with the internet through the firewall, thus inhibiting the application’s ability to sync, receive and send Emails. Simply disabling any third-party firewall programs (or completely uninstalling them, for that matter) and using the default Windows Firewall instead will turn the Mail app back to normal. With no third-party firewall standing between it and the World Wide Web, the Mail app will easily be able to sync with any and all Email accounts and retrieve and send Emails. Most of the third-party applications can be easily disabled by right clicking on the application (firewall/antivirus’s) icon in the lower right corner where the clock is and choosing “Temporarily Disable AVG Protection” or similar if using other third party application. You can also refer to steps at the bottom to only allow the svchost.exe process. If you don’t want to disable it then you can proceed with the methods below to add it as an exception; since there are a lot of anti-virus and 3rd party applications; i’m going to list the steps for the most common ones used.
Allow the svchost.exe process to communicate (Windows Firewall)
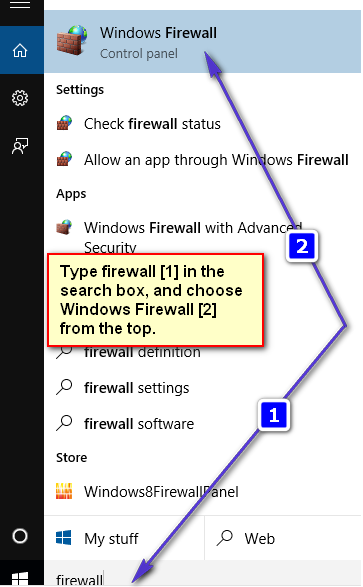
In the event that you are receiving error code 0x8007274c and 0x80072726 while you are not using a third-party firewall program and the only firewall protecting your computer is Windows Firewall, disabling your firewall is the exact opposite of the right move. Disabling Windows Firewall can leave your computer extremely vulnerable, so try the following instead: Click on the Start button located in the lower left corner and type Windows Firewall. then choose it from the list of results.
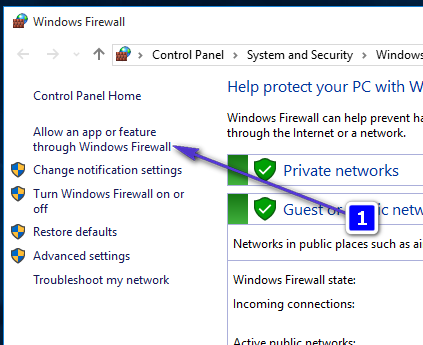
Then choose “Allow on an app or feature through windows firewall” located in the left pane.
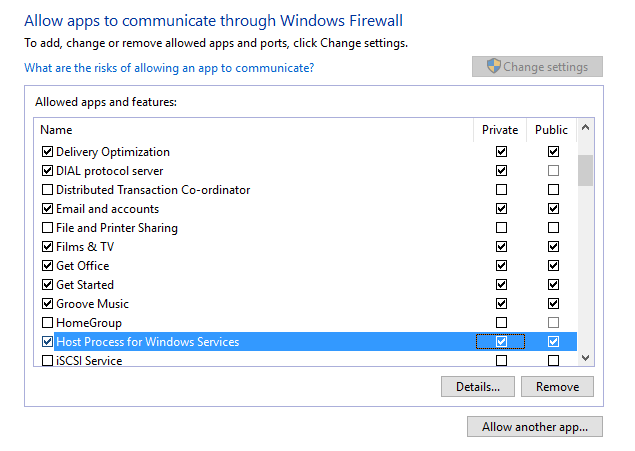
From the window which opens up; choose Allow Another App and locate the two svchost.exe files and add it. Add the following After it has been added, in the list of firewalls you will see a new app with name “Host Process for Windows Service”. Make sure it matches the image below. Click OK to exit out and test. If you are using a third party firewall then choose the method that best fits your (AV program from below) and perform the instructions. Allowing the svchost.exe in Windows Defender From the lower left corner Click Start and type Windows Defender. Click and choose Windows Defender from the list. Scroll down until you see Exclusions, click and add exclusion. Under Processes, choose “Exclude a exe, com or str proces” and exclude the following:
Adding svchost.exe in BitDefender
If you are using BitDefender then open it, choose Protections -> Firewall. Locate and click on Adapters, and add the network you’re on to trusted.
Adding svchost.exe in AVG
If you’re running AVG then you need to add the TCP Ports in the AVG Firewall which are 993 and 465. This is done via the Firewall feature in AVG. AVG has the instructions listed here
How to Fix Windows Live Mail Can’t Sync and Displays Server Error 0x80072F06Adaptive Sync Monitors: Freesync vs G-SyncFix: Windows 10 Mail Sync Error 0x86000c0aFix: Error Code 0x8019019a when setting up Yahoo Mail in Windows 10 Mail App


