These distributions of Linux include a simple tool that will help you to rectify the problem. Before you proceed, however, you might want to make sure you didn’t just turn spell checking off. There’s also a small chance that you just haven’t been spelling any words wrong!
Method 1: Installing Languages on Ubuntu
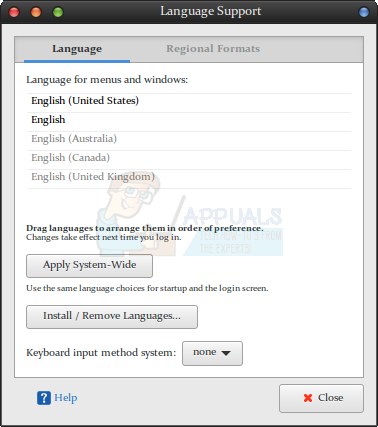
If you’re using Ubuntu, then you can click on the Dash and select System Tools to open Language Support. The same can be said of using Whisker Menu in Xubuntu or Debian-Xfce as well as the Applications and System menus in Lubuntu as well as Ubuntu-MATE. You could also type the name into the Dash to start it. Once it comes up, it will take a few moments to scan your system. While we were using English on our system, these instructions should theoretically work for any language that receives full support. You’ll receive a message about how the application is checking for installed languages.
Check to see if there are any languages in bold. If there aren’t, then click on the “Install/Remove Languages” button and select your language. Keep in mind that you’ll need the right regional variant for your own country. English, for instance, comes in an international variety as well as varieties for Canada, Australia, South Africa, New Zealand, the UK and the USA according to the way that Ubuntu and Debian break it down. Make sure you have “English” plus the English for your locale installed. You can drag the languages according to your order of preference and then select “Apply System-Wide” to completely finalize your changes once you’re done.
You may receive a warning during this that there’s no information about system languages available. If you receive this, then click on “Update” as long as you’re connected to the network. Your installation might need to collect some information from the repositories.
You might also receive a message altering you that language support isn’t totally installed. Click on Details for more information if you’d like and then click on Install. Whether you inspect the details or not shouldn’t actually change the process since this is non-interactive.
Once you’re sure that you’ve completed the installation, you can click on Close to remove the window. If LibreOffice is open, then you’ll need to close it and restart it. Otherwise, simply start LibreOffice and head to the Edit menu. Select Preferences and make sure that spell-check is turned on. If you had a document from before that spell-checking failed for, then you’ll need to possibly either type a bit in it or push the enter key to get it to recognize what you’re looking for. Activation of spell check subroutines can be sometimes delayed for various reasons. Note that if you want the word processor to check your text in more than one language, then you’re going to have to select them not only when installing the language but also here. Each document can usually only get checked out in a single language. If you’re having problems with dual-language documents, then you’ll need to check LibreOffice’s documentation to ensure that your version offers support for this advanced feature. Right-click on any words underlined in red to correct them, but keep in mind that the spell-correcting subroutine is by no means flawless and will offer you plenty of false-positives. Once you’re satisfied with your changes, save the document by clicking on the Save icon, selecting the File menu and hitting save or using Ctrl+S on your keyboard. Some users like to ensure that the spell check dictionary will remain on by closing out LibreOffice and then reopening it with the same document. This kind of test is more than likely unnecessary, but it won’t cause you any issues if you’d prefer to double-check.
Method 2: Activating Spell Check in Abiword
While Ubuntu and Xubuntu have LibreOffice installed by default, Lubuntu instead has Abiword. You may have also installed Abiword independently of your distribution’s configuration since it’s part of a standard Ubuntu package. Some variants of Debian and a few self-rolled distributions of Linux Mint prefer this word processor as well. If this is the case, then start Abiword before going any further. You’ll have needed to have at least some language installed to proceed, but you should automatically have the basic language configuration left over from your installation of whatever *buntu, Debian or Mint installation you went through with. You may want to start typing in the Dash, open it from the Dash and Applications menu, open it by clicking on Office in the LXDE menu if you’re using Lubuntu or starting it from the Whisker menu if you’re using Xubuntu. In any case, once it’s running you can try typing some text and while you’re doing so check to see if it automatically underlines misspelled words in red. While AbiWord and LibreOffice might look functionally different, you shouldn’t find that they have any functional difference in the way you enable these checks.
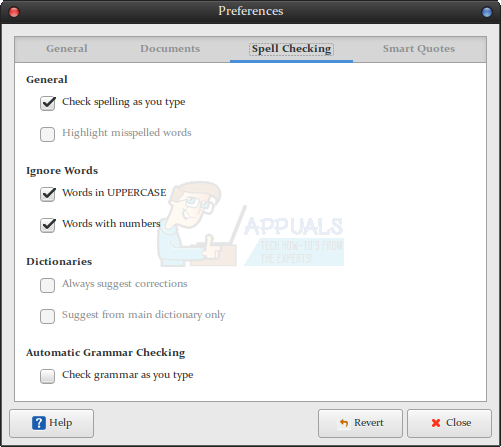
If it does, then you’re finished. If not, then click on the Edit menu and select preferences. You can also push F10 and maneuver toward it with the cursor keys. Select Spell Checking and make sure that “Check spelling as you type” has a check next to it. You may want to ignore words in uppercase or those with numbers as well. Try typing text again and you shouldn’t have any further problems. Note that there’s also a “Check grammar as you type box,” which you’ll need to check as well if you want to enable automatic grammar checking. Even if you have all the language support options installed, you might find that automatic grammar checking can be rather slow.
How to Fix Error Reference Source not Found when Printing from Office 2010,…Fix: Spell Check not working in WordFix: Google Docs Spell Check not WorkingSkyrim ‘Spell Research’ Mod Completely Redesigns Magic Gameplay


