When looking at all the things that might make your WIndows 11 OS perform slower than usual, there are actually a lot of different potential culprits. All of them have a small impact on your system’s performance, but when you add them all up on a system with limited resources you’ll end up experiencing general system sluggishness as your PC struggles to find the computing power required to keep things running smoothly. Here’s a list of optional Windows 11 features and components that are known to cause your Windows 11 computer to behave slower than usual: Now that you are familiarized with every element that might make your Windows 11 computer perform slower, let’s go over the various things that you can do to optimize the performance of your operating system.
Disable Unnecessary Privacy permissions
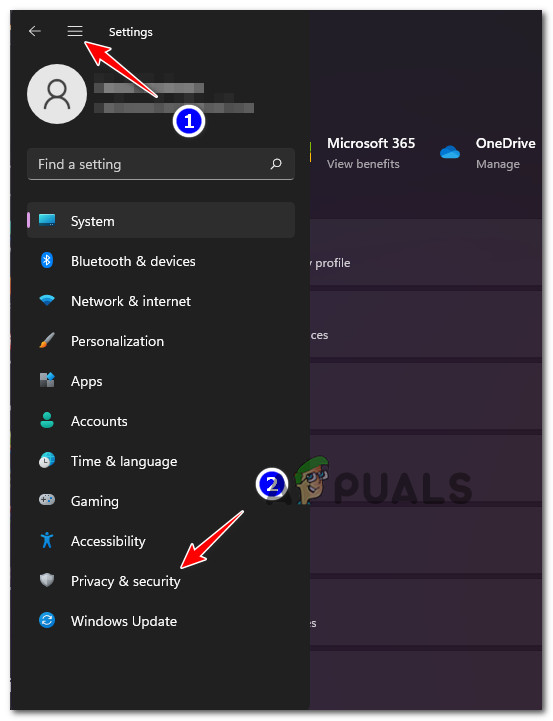
With Windows 11, Microsoft has made a big push with personalized ads and widgets that will display locally relevant advertising content. While this is all great since you’ll be receiving ads that will actually interest you, it’s not great at all for your overall system performance. Early Windows 11 adopters are beginning to realize that all these extra services used by Windows 11 to display personalized ads and content end up hogging a lot of precious system resources – while this is not an issue on a high-end PC, expect to experience general sluggishness when utilizing Windows 11 on a system with limited resources. Fortunately, you can alleviate this problem by accessing the Privacy and Security tab in your Windows 11 settings and disable every unnecessary privacy permission. Note: This will ensure that the services behind these permissions will no longer run and hog your system resources. Follow the instructions below for a step-by-step guide on disabling every unnecessary ad permission service on Windows 11 in order to improve the performance of your system: If you’re still experiencing slowness and general sluggishness when using your Windows 11 computer, move down to the next method below.
Adjust Performance Options for Best Performance
If the modifications enforced above have only improved the performance of your Windows 11 computer marginally, one more thing that you can adjust is the Performance Options. As you know, Windows 11 has a lot of new animations that give it that modern aesthetic. But while all of these effects are very pleasing to the eye, they can also have a big impact on your system performance – especially if you’re using PC with a low-end dedicated GPU. In this case, a trip to the Performance Options (inside System Properties) will allow you to improve the performance of your Windows 11 computer by disabling every unnecessary animation and optimize the UI for the best performance. Note: Keep in mind that by default, Windows 11 is configured to adjust these settings for the best appearance. Follow the steps below for the complete instructions on adjusting the Performance Options on Windows 11 for the Best Performance: In case you’re still experiencing general system sluggishness even after making this modification, move down to the next method below to learn how to disable startup services that might affect the performance of your Windows 11 computer.
Disable unnecessary startup services
If you’re only experiencing general sluggishness associated with Windows 11 a few minutes after your computer boots up before the OS finally starts to perform normally, chances are the startup services you presently have configured are hogging a lot of system resources. In case you find yourself in this particular scenario, you should be able to fix this issue by taking a look at your fleet of Startup items and disable every entry that you don’t actually use. If you have a lot of unnecessary startup services that have a medium or high impact, this change will dramatically improve the time it takes until your Windows 11 OS start behaving normally once you boot it up. Follow the instructions below for some step-by-step instructions on disabling every unnecessary startup service on Windows 11: In case your Windows 11 installation is still slow and unresponsive, move down to the next potential fix below.
Optimize your OS drive
If most of the slowness associated with Windows 11 happens when you’re using File Explorer or when you’re attempting to copy, move or replace files on your OS drive, chances are you’re dealing with a heavily fragmented drive. In this case, the best course of action is to use the Optimize Drives feature on WIndows 11 to defragment the drive where Windows 11 is installed to make sure you get the best possible performance out of your HDD or SSD drive. Several affected users that also utilized this fix have reported that the sluggishness happening when using File Explorer has all but disappeared. Important: This method won’t do much for you if you just clean installed Windows 11 after formatting the drive. However, it’s known to be very effective in situations where the PC was upgraded to Windows 11 from an older Windows version. Follow the instructions below for a step-by-step guide on optimizing the drive that is currently storing Windows 11:
Cleanup System Files
If you haven’t done this yet, you should also attempt to utilize the Disk Cleanup utility to make sure you have no unnecessary DirectX Shader Cache, Delivery Optimization Files, Temporary Internet files or Downloaded Program Files that might make your Windows 11 computer perform slower than usual. If the problem only started to occur recently, follow the instructions below to run a Disk Cleanup scan to remove every unnecessary system file: Note: Make sure you’re not running any resource-demanding task before following the instructions below. If you’re still facing the same kind of issues, move down to the next potential fix below.
Delete Temp and Prefetch items
Another potential culprit that might be causing general system slowness on Windows 11 is corrupted data present in the Temp or Prefetch folder. Both of these directories are vulnerable to hosting corrupted system files on Windows 11, especially if you’re using insider build versions. Several users that we’re also noticing that Windows 11 was performing increasingly slowly have confirmed that the Windows 11 became ‘snappy’ again after they cleared both of these directories. Note: While Temp is a directory used by Windows to store temporary system files related to your applications and system processes, Prefetch is dedicated to storing temporary launch data that is used to improve boot times and program launch times. Both of these directories can be cleared without affecting other OS components. Follow the instructions below for steps on clearing both the Temp and Prefetch folders on Windows 11: If the problem is still not fixed, move down to the final fix below.
Adjust the MouseHoverTime (if applicable)
If you feel like the on-screen cursor is lagging behind your actual movement of the mouse, your Windows 11 installation is most likely suffering from the ‘MouseHoverTime bug’ that’s affecting a lot of upgrade PCs that make the transition to Windows 11 from an older Windows installation. This is most likely the case if only your mouse seems slow but the overall system performance seems normal. What happens is a Registry value gets incorrectly migrated to WIndows 11 and displays a value that is the wall over the normal parameters. Fortunately, you can fix this issue and resolve the ‘laziness’ of your mouse by using the Registry Editor to modify the MouseHoverTime string to an acceptable value. Follow the instructions below to enforce this fix: If this method was not applicable in your scenario, move down to the next method below.
Running SFC, DISM, and CHKDSK scans
In case none of the methods above have proven to be expective in your case and your hardware should be more than capable of running Windows 11 smoothly, you should start considering a potential issue caused by corrupted system file components or a faulty drive. First things first, you should do a CHKDSK scan & repair and see if your current storage device has some block issues. In case the drive begins to fail, the Check Disk utility is capable of replacing data sectors going back with unused sectors (if available). Once the Check Disk scan & repair scan is complete, reboot your PC and wait for the next startup is complete before initiating an SFC scan. Note: SFC will replace local file corruption using healthy equivalents from a local storage cache. An internet connection is not required. Once the SFC scan is complete, reboot your computer once again and wait for the next startup to complete. Finally, go ahead and deploy a DISM scan. Note: Make sure you have a stable internet connection before deploying a DISM scan. This tool uses the WU component to download healthy system files that will be used to replace corrupted equivalents.
Fix: Computer Slow & Lagging after Windows 11 22H2 UpdateFix: This Computer Can’t Connect to the Remote ComputerFix: YouTube Running Slow on Your ComputerHow to Fix Windows Could not Start the Windows Audio Service on Local Computer?